Posts Tagged ‘Arduino’

arduinoplay_cover-front-final

Arduino Playground by Warren Andrews is a great collection of Arduino projects. With an ever-growing collection of Arduino books on the market, it is getting difficult for a book to stand out. Many books are introductory project books to get someone up and running. The projects and programming in most books is simple and offers little to a more advanced user.

Screen Shot 2017-05-24 at 5.00.32 PM

Sample page posted with permission from No Starch Press

Arduino Playground  focuses on more advanced projects and cod that is often pages long. The sample page, right, shows the end of a program and some brief discussion. While the code printed in the book lacks comments, important lines are marked with numbers. This makes it very easy to identify critical lines of code and the expanded discussion following the code provides lots of insight.

The sample page on the right also mentions shields. Arduino shields are expansion boards for the basic microcontroller. These boards can add everything from sound to motors to sensors. Many Arduino projects use one or more shields. For example, the project referenced in this sample page discusses a motor controller shield. Arudino Playground goes into good detail to discuss how things things are electrically wired. The author discusses power loads and various votlage supply rails. This information is critical to more-complex projects and is a welcomed addition to this book.

Most Arudino books focus on the Arduino Uno board, the most famous form factor of the popular microcontroller. Arduino Playground uses the right board for the right project. This means some projects use the compact Arduino (my preferred board). This board requires a bit more work as the user needs to solder wires to the various pads. The sample page below shows a nice project photo with the Arduino nano and various modules and plugs. However, even with cool projects, the book does not do well to promote the projects on the cover or early in a chapter. The lack of color print also detracts from the promotion many of these projects deserve.

Screen Shot 2017-05-24 at 4.57.55 PM

Sample page posted with permission form No Starch Press.

Overall I really liked the Arduino Playground. I enjoyed working with more than just an Arduino Uno. The scope of the book is great for those looking for something a little more complex than the range of starter books already on the market. However, this book is in a very crowded market and it lacks the color print of other Arduino books. While it certainly is a good book content wise, I think it could have been even stronger with color printer and better presentation of the projects.

Test Setup

This past summer my brother and I ventured to the Bahamas for a short vacation. As amateur radio operators, we thought it might be fun to work from a different country. Several weeks before our trip, we received our reciprocal licenses from the Bahamas. Assigned the suffix “/C6A”, it was then time to figure out my rig.

Traveling with a radio is hard. Antennas for HF typically require lots of area, and people ask lots of questions.I wanted to have a small radio that I could operate from the beach. My brother brought his Elecraft KX2, but my Icom 706MKII would be too bulky. Follow me after the break to learn more about my solution.

(more…)


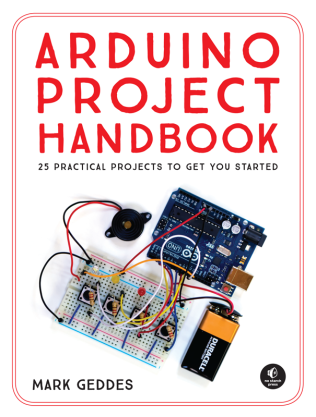
CoverNo Starch Press recently released a new book in the making space. This latest entry, titled Arduino Project Handbook by Mark Geddes, joins the many existing Arduino books on the market. Over the past few weeks I have been reading the book and making some of the projects. The book has a wealth of knowledge to share.

Overall, I really liked the book. I do want to get my one main complaint out of the way now. Based on the title and description, I was expecting a book of projects from start to finish. This book only goes as far as the breadboard. I was expecting projects to have enclosures and mounting of elections, a mixed-media problem faced by many new makers. However, none of the projects make it that far.

APH4

Sample page, used with permission from No Starch Press.

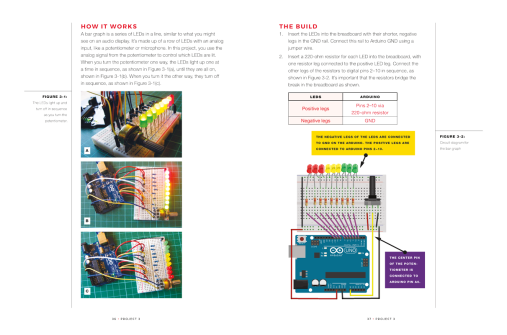
Once I adjusted my expectations, I really got into the book. Most projects are presented with some pictures and then a wiring schematic. You can see that in the sample page to the right or below.  The wiring schematic uses symbols that closely match what the actual part looks like, instead of the traditional electronics schematic. This is really helpful for new makers. From both the wiring schematic and the pictures it is really easy to make sure you wired your project correctly.

APH2

Sample page, used with permission from No Starch Press.

All of the projects, save the last few, use the Arduino Uno. The last few projects do not use the Uno, rather using the ATMEGA328 on a breadboard. While still using the Arduino firmware, this is a good way for makers to condense the number of boards in a project.

The projects are creative and fun, ranging from blinking lights to a weather station. Some projects require just a few parts while others are a bit more complex. Many of the individual skills are easily applied to other projects. For example, several projects use an LCD screen or servo motors, two of the most common devices in maker projects. Furthermore, the sample code is clearly commented and published in the book. This is huge as many publishers are moving this content online, making it harder to follow. I found this helpful when working on my desk when my internet went down. I was able to keep tinkering and following the instructions without having to worry about reaching the publisher’s website.

Overall this is another great Arduino book. Mark Geddes does a great job of showing how new makers can leverage an Arduino. I recommend the Arduino Project Handbook for any aspiring makers and those new to electronics! You can find the book on amazon for under $20. For that price, I think it would be a great addition to any maker’s library!


Sock-Anklet-App

So unless you have been living under a rock, I am sure you have heard of the ‘smart sock’, Sensoria Fitness. Heapsylon, the company behind Sensoria, sent me a prototype of Sensoria Gaming. Sensoria Gaming seeks to leverage the smart fabric and enable it to do much more than track your workout. The sock is able to isolate the pressure over different areas of your foot, allowing for unique inputs. The sock is super accurate and this lends itself to many applications. You can generate pressure heat maps and watch how pressures changes with balance. Sensoria Gaming gives the tools to use this input in a new setting, both in software applications and physical products.

Remember that helicopter post from before? Now you know why it crashed. (Turns out I stink at flying those things!) Actually it was much easier once I finished the project. As you can see in the picture below, I took a servo motor and duct taped it to the controller. I used some LEGO parts to make an arm and control it with an Arduino. The Arduino is connected to my computer. I connected the sock to my computer and used some LabVIEW magic to make the sock talk to the arduino. I add in some filtering for signal stability and there you have it. A brief video of it working is below, as well as some ‘outtakes’ from flying…

WP_20130806_003

Sensoria has a bit of time left on Indiegogo if you want to get in on it. This is not my only hack with the smart sock, so rest assured, more cool projects are coming.

My helicopter hack video:

Official pressure map video from Heapsylon:

Small RC helicopters have been used in countless hacks, but not every hack goes according to plans. While working on a computer controlled RC helicopter, a bug in my Arduino code caused the helicopter to crash. Most of the time these cheap RC helicopters are just fine, but turns out falling from 20 ft into cement isn’t a ‘recoverable’ accident. Oops…

Helicopter with battery removed.

Helicopter with battery removed.

Now I do have a spare helicopter, so the project will continue (just had to find it…). But what to do with the old helicopter? Well it turns out these cheap little buggers are full of components that are handy to have around. Take for example the 3.7 volt battery housed in the noise. It just so happens that I could use one of these for another project. I got out my soldering iron and desoldered it from the broken aircraft. Next I took a LiPo charger from Sparkfun and attached a couple of leads. After some twisting of some wires the battery began to charge. Check out the pictures of this quick and simple hack. There are a few more toys inside the helicopter including some gears, a few switches, and a couple of motors, so expect those to be removed soon.

Hacked together charging system for battery from charger.

Hacked together charging system for battery from charger.

Just in case you were wondering on how I am controlling the helicopter from the Arduino. I have simply attached a couple of servo motors to the stock controller. This is far from the best solution as these motors can sometimes slip off their posts. I am working on using PWM, a simple RC low-pass filter and direct input into the controller. This should make things a bit more controllable. The only thing is to now figure out a way make sure the hack is reversible. Just in case I want to use that RC helicopter again for, you know, normal operation.

It is worth noting that the battery from the helicopter is a LiPo at 3.7 volts and 170 mAh. Not a bad deal since the closest thing from Sparkfun retails at $6.95, is only 110 mAh, and I only paid $11 bucks for the helicopter off ebay (including shipping). Plus, I am sure there are a few other goodies in the controller that I can put to some use. Not such a bad day after all!

This project has kind of been a secret, but it seems to be nearing completion and I really want to share it. For Christmas my parents got me an iRobot Create. I am a huge fan of the Arduino and wanted to get a shield for it. I soon discovered that there were no good shields for the Create so I set about making my own. After several revisions (and some magic blue smoke) I finally have a working board. I have not populated all the features of the latest revision (Rev. C) yet, but I do have status LEDs and basic serial communication working. What does my shield do? This board provides power LEDs for all major power supplies coming from the Create, it also allows the Arduino to monitor the battery level. There are header’s for the Create’s built in I/O as well.

While the board is working correctly, it is not quite perfect. The big issue is that there is a ton of heat coming from the Arduino. This is from the voltage regulator. I am well within tolerance, but linear voltage regulators are known to put off a ton of heat. I plan to add some voltage regulation to the shield so it does not put so much strain on the built in Arduino regulator.

So now for the bad news (or good news depending on how you look at it). Tomorrow I leave to go to Australia. I am going to Rose-Hulman’s Oakley Southern Sky Observatory in New South Whales, Australia. That means I will not be working on this shield for a about a week (or other NXT projects). I will be blogging some of the images from my trip. Another hobby of mine is Astronomy. Last year I wrote some software to control our observatory. Think of it as a really big (super expensive) robot. In addition to doing some work at the Rose-Hulman Observatory, I will also be visiting Siding Springs Observatory, located just a few miles away.

OpenElectrons.com has made an NXT replacement of sorts. Leveraging the power of the Arduino platform, this shield allows the popular prototyping tool to interface with 8 RC servo motors and NXT motors and sensors. The shield has some integrated buttons and operates over I2C. The library for the shield contains both hardware and software I2C implementations, allowing for full support of Mindsensors products at faster speeds.

The video below shows a simple program I wrote. Using the Mindsensors LineLeader and SumoEyes. The robot is constructed out of LEGO parts and uses LEGO MINDSTORMS motors and sensors. There are axle holes to mount the shield and the NXShield is small enough to use with other Arduino shields (think xBee shield or midi shield). Watch the video for more details, but this robot doesn’t even come close to using the full power of the Arduino platform. I have a few more projects in mind with the platform. In addition, I recently ported the library to the Maple. I am still doing some final testing, but if you would like to give it a try, post a comment below!


I love coaching FIRST LEGO League. It is a ton of fun and it is always interesting to see all the different robot ideas. One major challenge for my FLL team was building a strong motor base. While there are many good ideas out on the internet, I wanted to share one that my team really likes. Using 2 Technic frames and 1 1×13 beam, they were able to build a strong base. I have used this design before and I have been very pleased with the results. As you can see from the image, it is just a few parts and you are ready to go.

Actually, I used this design for a small robot I built last month. This robot uses the NXShield from Mindsensors. The video is on YouTube, though it wont let me make it public. I will work to get that sorted out and post again with the video in place. This is an early picture, but you can see the frames and base in the photo. I added a few more sensors for the video, but you can see how small and compact the robot is. In fact the entire robot is about 25 cm long and 20 cm wide. The robot is strong, and while I don’t recommend dropping your design, this one has survived a few falls.

The NXShield uses an Arduino and can easily be programmed in C. It has 4 motor ports and 4 sensor ports. My completed bot used a few touch sensors, a Mindsensors LineLeader, and a MindSensors Sumo Eyes. If you would like to learn more about Mindsensors and the NXShield, SumoEyes or LineLeader, check out Mindsensors.com.

Got an idea on how to make a motor base? Post below! What is your best design?